OpenAI just announced the Apps SDK during OpenAI DevDay 2025. It quietly introduced something important, transforming ChatGPT from a Chat app to an App Platform.
I wanted to understand how this works in practice, so I decided to build something small: a to-do app (because, well, this is something you build when you learn something new).
Here’s the plan:
- We’ll build a ChatGPT App that can read, write, and sync a to-do list in real time.
- We’ll keep things simple: no database, no cloud setup, no fancy frameworks.
- We’ll use JavaScript, Express, React, and MCP (Model Context Protocol).
It’s the easiest way to see how to build a simple ChatGPT App in real life. This tutorial walks through that process from scratch: how to build, connect, and finally, make ChatGPT aware when your app updates.
Here’s the flow we’re going for:
- You ask ChatGPT: “Add create tutorial to my to-do list.”
- ChatGPT calls your MCP tool
addTask. - The server stores the task in memory.
- The React UI updates instantly to show it.
- Later, when you check a task off in the UI, ChatGPT knows it happened.
That last step is the interesting one, your app notifying ChatGPT when something changes. We’ll get there.
You’ll only need a few things to follow along. Make sure you install them before going to the next steps.
- Node.js
- npm (this is included when you install Node.js)
- ngrok (for exposing your local machine to the internet)
Let’s start clean.
Here is the folder structure that we will set up:
chatgpt-app-todo/
├── server/ # Express + MCP server
│ ├── index.js # Entry point for backend
│ └── package.json
├── client/ # React frontend
│ ├── src/
│ │ └── App.jsx # Main UI component
│ ├── index.html
│ └── package.json
In your terminal, just run these commands:
mkdir chatgpt-app-todo
cd chatgpt-app-todo
mkdir server client
Build the Server
The server will do two things:
- Provide a basic REST API that the React app can talk to.
- Register MCP tools and resources so ChatGPT can call them.
Let’s start with the basics.
Inside /server, we will install some simple dependencies before coding.
cd server
npm install --save express cors body-parser
touch index.js
In index.js, we will create a simple server to handle some basic endpoint to create tasks, list tasks, and mark task as completed.
import express from "express";
import cors from "cors";

const app = express();
app.use(cors());
app.use(express.json());

let tasks = [];

app.get('/tasks', (req, res) => res.json(tasks));
app.post('/tasks', (req, res) => {
  const newTask = { id: Date.now(), text: req.body.text, completed: false };
  tasks.push(newTask);
  res.json(newTask);
});

app.post('/tasks/:id/complete', (req, res) => {
  const task = tasks.find(t => t.id === +req.params.id);
  if (task) task.completed = true;
  res.json(task);
});

app.listen(3000, () => console.log('Server running on http://localhost:3000'));
Now you can run your server with node index.js.
You should see Server running on http://localhost:3000. When you visit http://localhost:3000/tasks you will receive an empty array [].
That’s the simplest version of the API and perfect for now. If you are a software engineer, this only takes a few minutes.
Build the Client
We’ll keep this simple too. We will spin up a new React app with JavaScript using Vite. In client, run
cd client
npm create vite@latest
Answer some questions to create the app, remember to choose React and JavaScript.
Update src/App.tsx with this, to create a quick Todo interface.
import { useEffect, useState } from "react";
export default function App() {
const [tasks, setTasks] = useState([]);
const [text, setText] = useState("");
const fetchTasks = async () => {
const res = await fetch("http://localhost:3000/tasks");
setTasks(await res.json());
};
const addTask = async () => {
if (!text.trim()) return;
await fetch("http://localhost:3000/tasks", {
method: "POST",
headers: { "Content-Type": "application/json" },
body: JSON.stringify({ text }),
});
setText("");
fetchTasks();
};
const completeTask = async (id) => {
await fetch(`http://localhost:3000/tasks/${id}/complete`, {
method: "POST",
});
fetchTasks();
};
const handleKeyPress = (e) => {
if (e.key === "Enter") {
addTask();
}
};
useEffect(() => {
fetchTasks();
}, []);
const completedCount = tasks.filter((t) => t.completed).length;
const totalCount = tasks.length;
return (
<div>
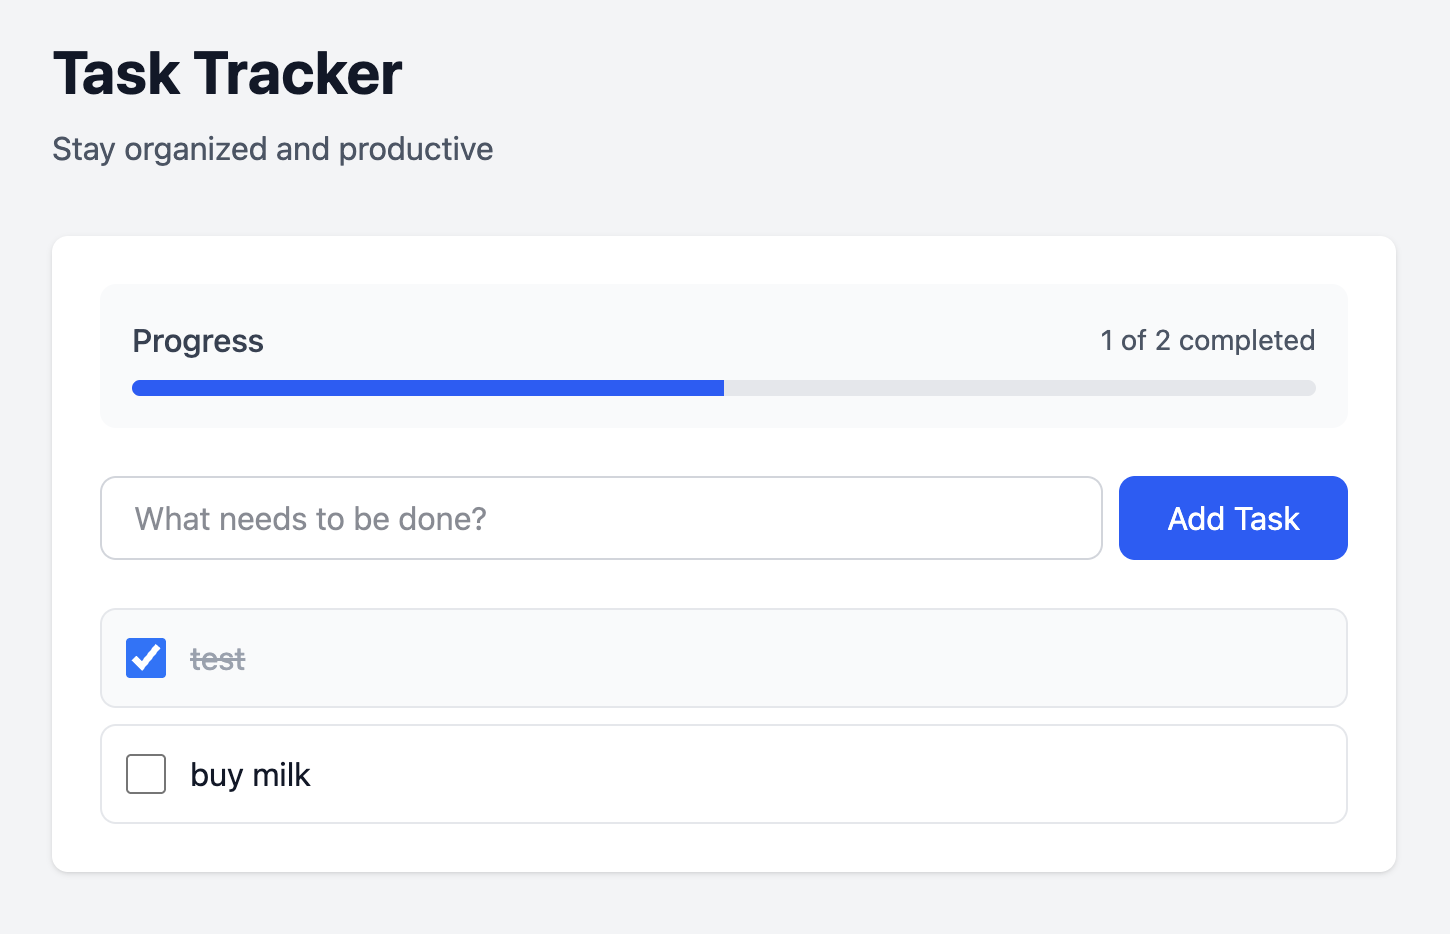
<h1>Task Tracker</h1>
<p>Stay organized and productive</p>
{totalCount > 0 && (
<div>
<span>Progress: {completedCount} of {totalCount} completed</span>
<div>
<div style={{ width: `${progress}%`, background: "blue", height: "5px" }}></div>
</div>
</div>
)}
<div>
<input
value={text}
onChange={(e) => setText(e.target.value)}
onKeyPress={(e) => e.key === "Enter" && addTask()}
placeholder="What needs to be done?"
/>
<button onClick={addTask}>Add Task</button>
</div>
<div>
{tasks.length === 0 ? (
<p>No tasks yet. Add one to get started!</p>
) : (
tasks.map((t) => (
<div key={t.id}>
<input
type="checkbox"
checked={t.completed}
onChange={() => completeTask(t.id)}
/>
<span style={{ textDecoration: t.completed ? "line-through" : "none" }}>
{t.text}
</span>
</div>
))
)}
</div>
</div>
);
}
I also added Tailwind to make it not boring. For setting up Tailwind, you can refer to the instructions here. It is pretty straightforward.
Now, when you run the app with npm run dev, then visit http://localhost:5173/ you now have a fully functional Todo app.
When you run npm run build, you will see your app artifact in client/dist folder.
That’s all the easy part, you might take a few minutes on this, the next part we will focus on building MCP (Model Context Protocol) server and connect the app with ChatGPT.
Building the MCP server
By now, you have a working local app:
- A small Express server that stores your tasks in memory.
- A React frontend that lets you add or complete tasks.
Now it’s time to make ChatGPT part of the loop.
Here is the high-level of the architecture when building ChatGPT app.

If you want to learn more about MCP, you can visit here. I also had another post to explain about MCP and why it matters.
For this tutorial, you can understand MCP as a bridge between ChatGPT and external systems. With it, ChatGPT can:
- Call your functions (called “tools”): for example, add a new task or get a list.
- Render custom UIs inside ChatGPT: using small HTML widgets (iframes).
- Exchange structured data between your app and ChatGPT.
In order to add MCP to your server, you need to install 2 dependencies
npm i --save @modelcontextprotocol/sdk zod
Register resource
Back to your server/index.js, add this code:
const createMcpServer = () => {
  const server = new McpServer({
    name: 'Todo List',
    version: '1.0.0',
  });

  const html = fs.readFileSync(path.join('../client/dist', 'index.html'), 'utf8').trim();
  server.registerResource(
    "chatgpt-app-todo-widget",
    "ui://widget/chatgpt-app-todo.html",
    {},
    () => ({
      contents: [{
        uri: "ui://widget/chatgpt-app-todo.html",
        mimeType: "text/html+skybridge",
        text: html
      }]
    })
  );

  return server;
};
The createMcpServer function is for creating your MCP server. This reads the final built HTML file from your React app. We’ll send this HTML to ChatGPT so it can display your UI directly inside its own window through an iframe.
There are something to note:
registerResource()lets you expose files or data that ChatGPT can use as visual components or structured resources.- The
ui://widget/...htmlURI is just a convention so that ChatGPT understands this is a UI. mimeType: "text/html+skybridge"tells ChatGPT it’s not a normal webpage, it’s an embedded widget that should be rendered inside ChatGPT.- You could make the return contents dynamic if needed, but here we just return your static HTML.
After this, ChatGPT knows that your MCP server offers a resource called chatgpt-app-todo-widget that can be displayed visually.
Then, you need to provide a way for ChatGPT to connect with your MCP server. In order to do this, you need to expose an endpoint for ChatGPT to call. In your server/index.js, expose an endpoint like this:
app.post('/mcp', async (req, res) => {
  const server = createMcpServer();

  const transport = new StreamableHTTPServerTransport({
    sessionIdGenerator: undefined,
    enableJsonResponse: true
  });

  res.on('close', () => {
    transport.close();
  });

  await server.connect(transport);
  await transport.handleRequest(req, res, req.body);
});
So, when ChatGPT sends an MCP message to POST /mcp, this function makes sure it’s handled end-to-end according to the MCP specifications. In production environment, you will need to handle authentication and authorization, but within this tutorial, we won’t do it.
Now, you have your MCP server. To test the server, you can use MCP Inspector, you can run the inspector with this command.
npx @modelcontextprotocol/inspector
Then, go to http://localhost:6274/, you will get the inspector UI. You can connect to your MCP server by inputting your URL. Click on List Resources, you will see your chatgpt-app-todo-widget.
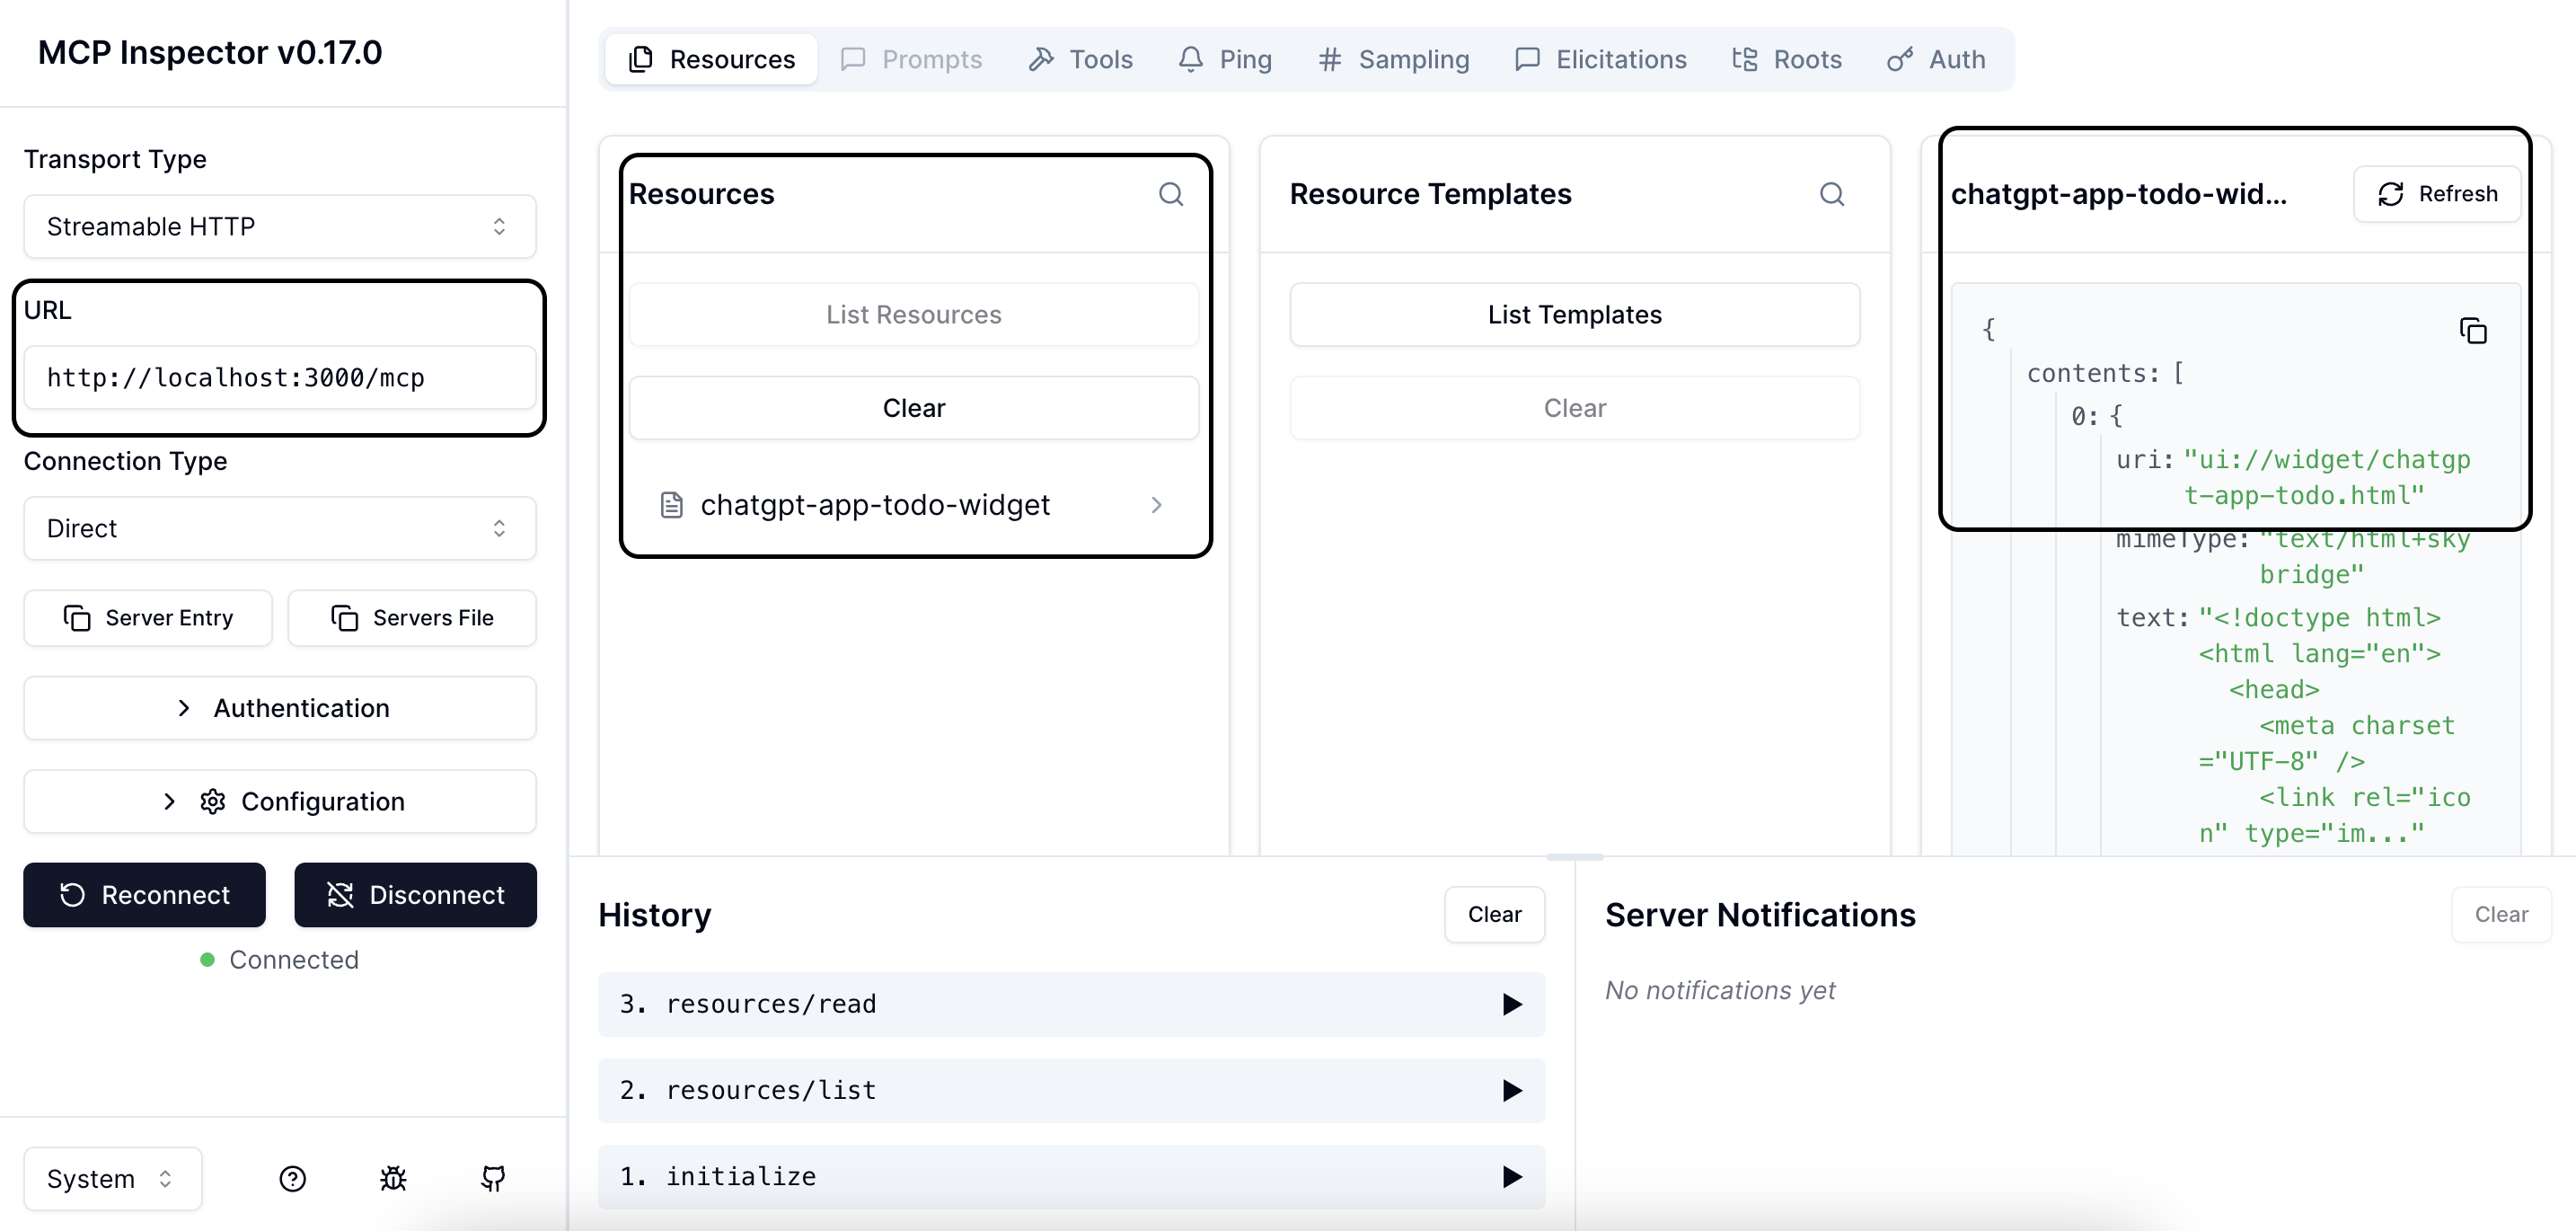
Please note that whenever you change your MCP server code, you need to reconnect to the MCP server in Inspector to get the latest changes.
Register tool
Now, let’s register a tool that ChatGPT can call when a user says something like “Create a new task: finish reading the MCP tutorial.”
In your createMcpServer function, add this:
  server.registerTool('createTask', {
    title: 'Create a new task',
    description: 'Create a new task',
    inputSchema: {
      text: z.string(),
    },
    outputSchema: {
      id: z.number(),
      text: z.string(),
      completed: z.boolean(),
    },
    _meta: {
      "openai/outputTemplate": "ui://widget/chatgpt-app-todo.html",
      "openai/toolInvocation/invoking": "Creating task...",
      "openai/toolInvocation/invoked": "Task created"
    },
  }, async ({ text }) => {
    const newTask = { id: Date.now(), text, completed: false };
    tasks.push(newTask);
    return {
      structuredContent: newTask,
      content: [
        { type: 'text', text: newTask.text },
      ],
    }
  });
There are 3 parts when you register a tool:
- The tool name.
- The configuration defines what the tool is and how it should behave so that ChatGPT can understand.
- The handler function that runs when ChatGPT calls this tool.
In configuration, you will have:
- The title and description in plain text, so that it can describe the meaning of the tool to ChatGPT.
- The
inputSchemaandoutputSchematells ChatGPT the shape of data the tool expects and returns. We’re usingzodto define and validate types. - The
_metato explain the user experience when ChatGPT triggers the toolopenai/outputTemplatetells ChatGPT which UI widget to show when this tool is used. In our case, it’s the same HTML widget we registered above.openai/toolInvocation/invokingis the message ChatGPT displays while the tool runs.openai/toolInvocation/invokedis what it says when the tool finishes.
In the handler function, there are things you need to note:
contentis the required field; this is for ChatGPT to show to the user.structuredContentis for the app; this will be validated with theoutputSchema.
We can test this by MCP Inspector, go to List Tools, then select the tool and choose Run tool.
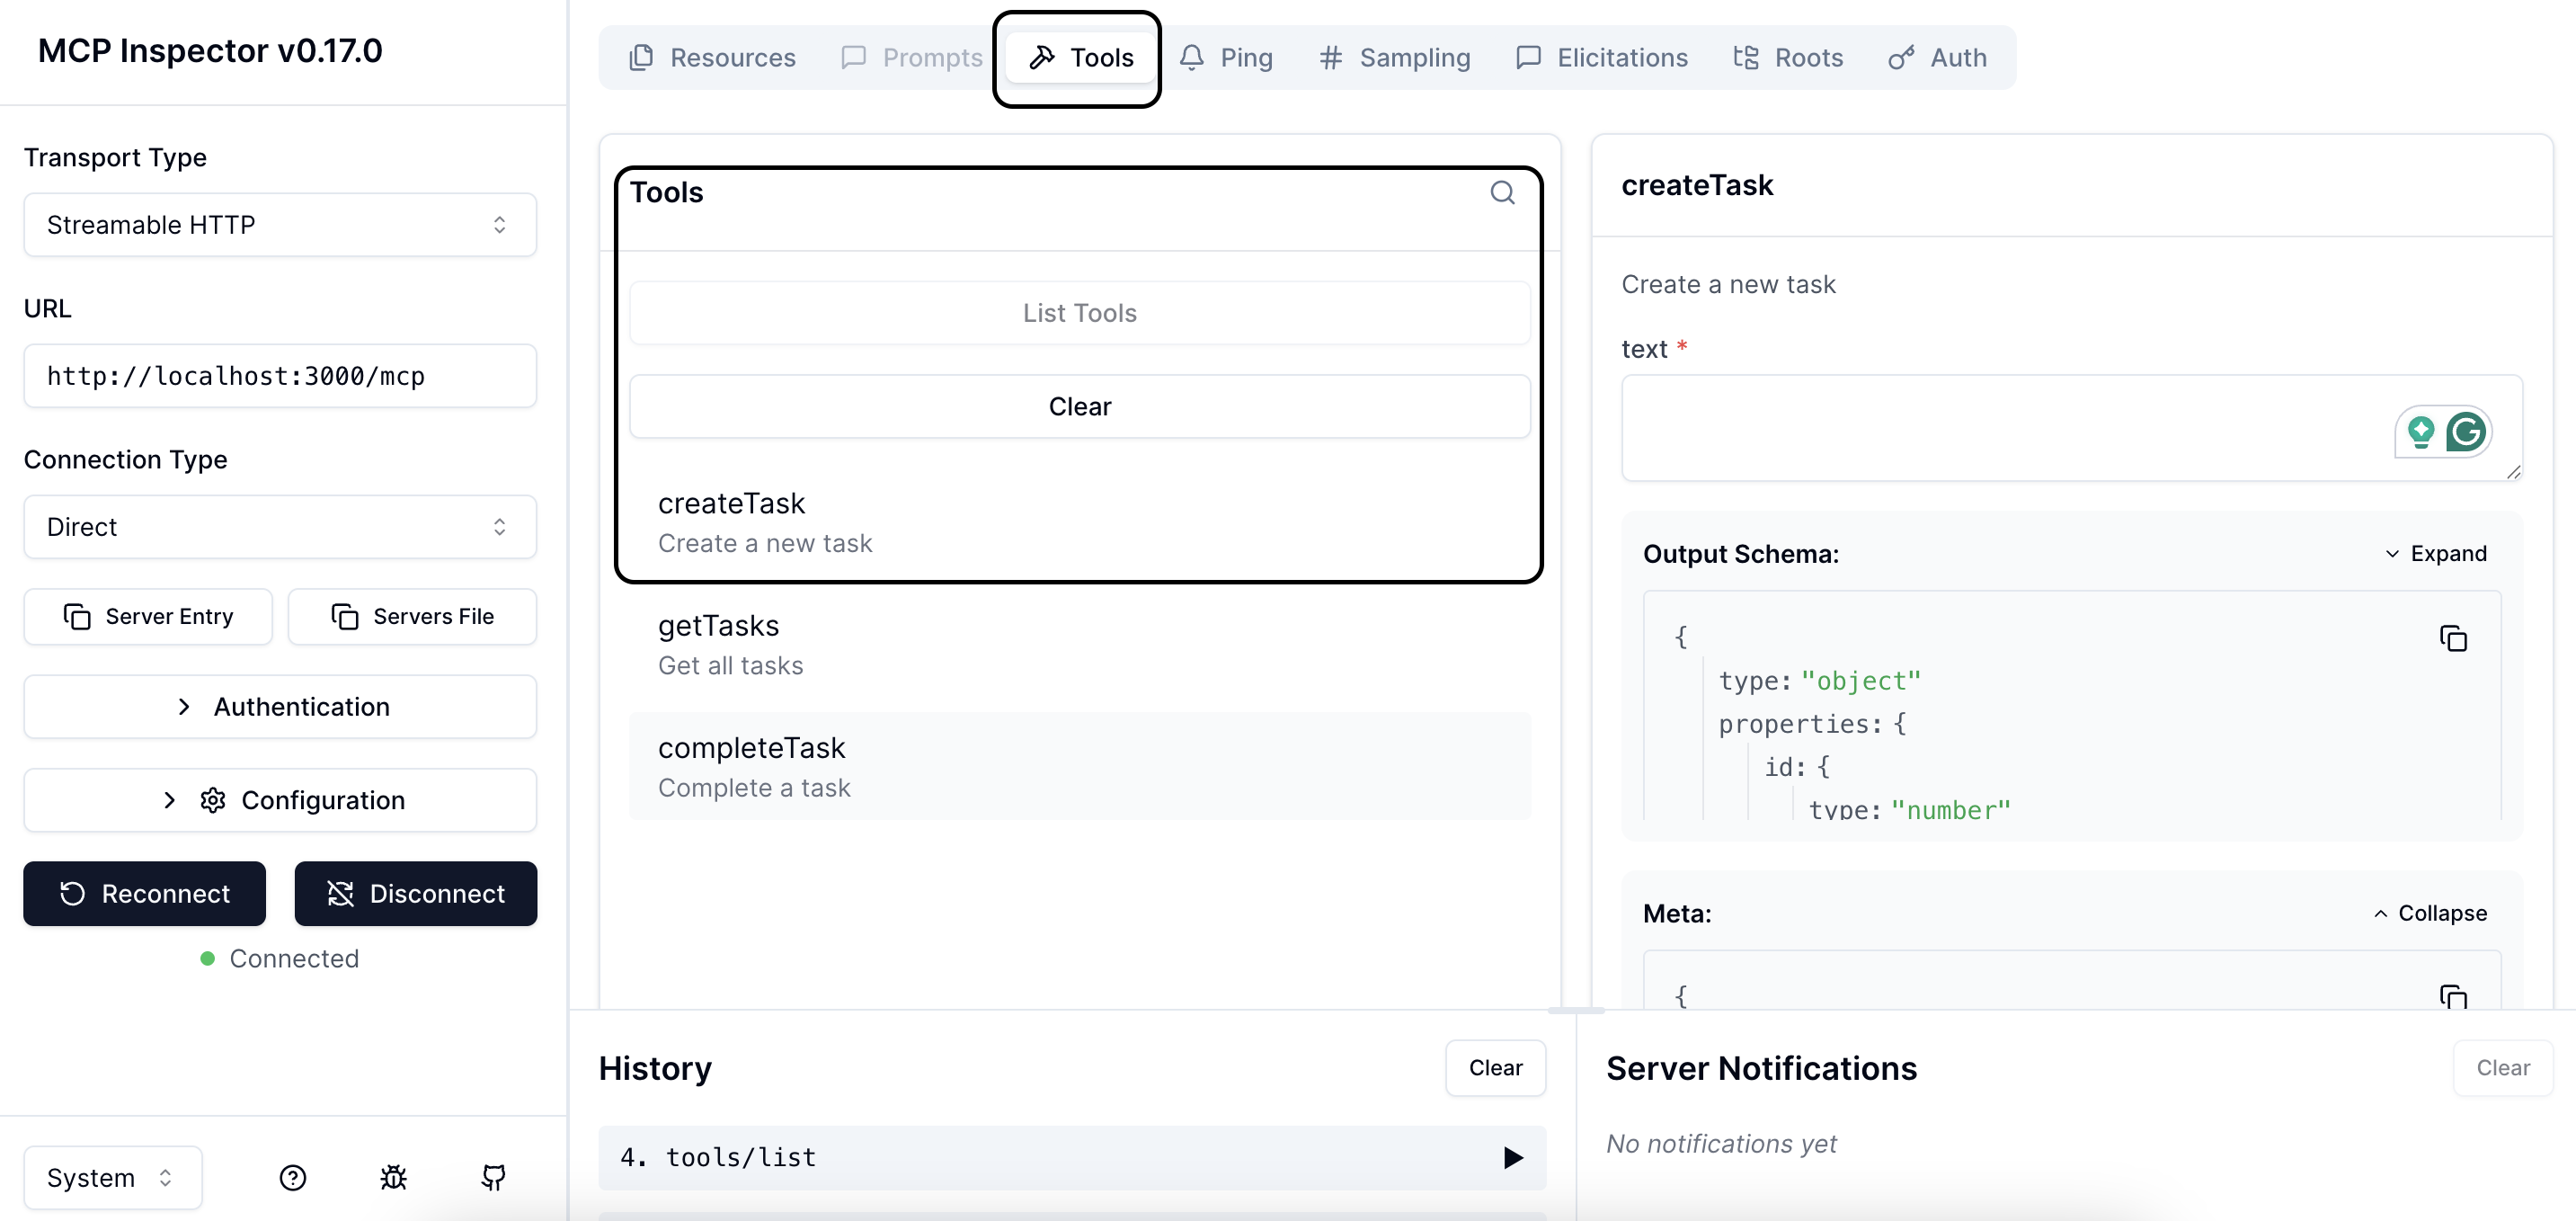
When you can run the tool successfully, you will see the result like this.

You can create other tools, such as get tasks, or mark a task as completed, similar to the example above.
At this point, you already have the MCP server that provides information to ChatGPT about:
- What your app looks like (via the registered HTML resource).
- What actions it can perform (via the registered tools).
Once you start your server and register it with ChatGPT, you’ll be able to chat: “Create a new task: finish reading the MCP tutorial.” ChatGPT will call your tool, update the shared data, and render your widget.
Connect your app with ChatGPT
First, please double-check if your server is running.
Now we will use ngrok to expose your server to the internet so that ChatGPT can connect.
ngrok http 3000
If you have already deployed your server and exposed it to the internet, you won’t need this step.
Now, you need to enable Developer Mode in ChatGPT.
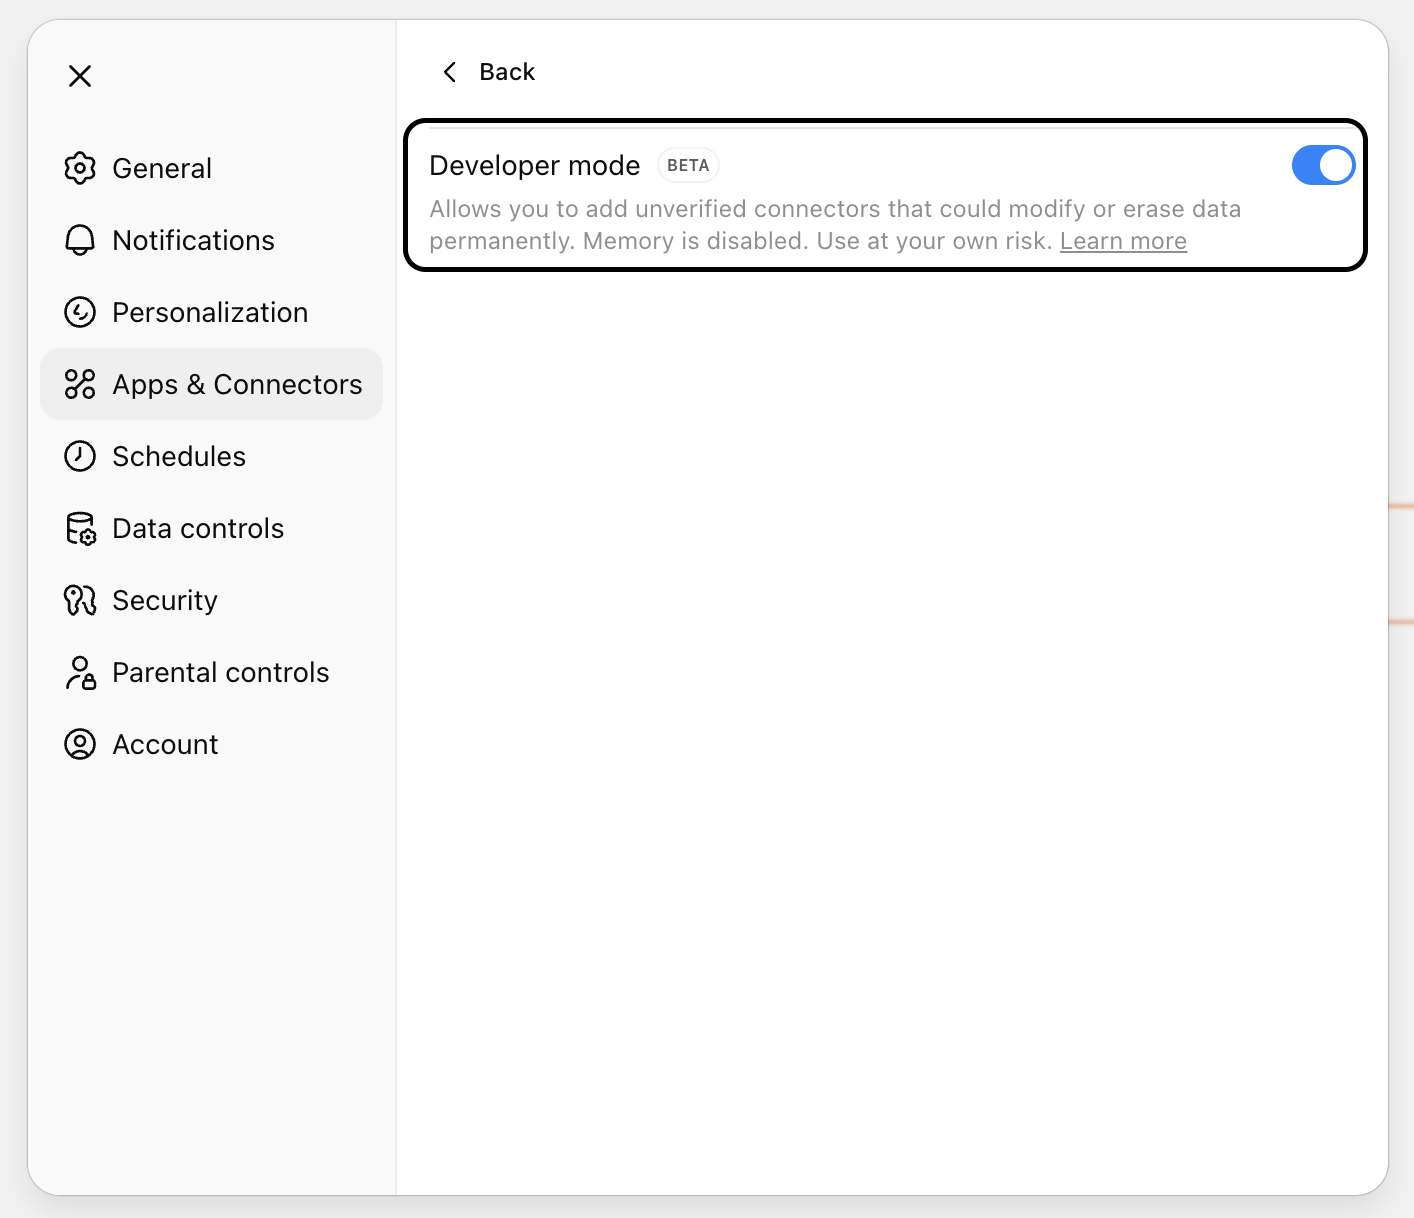
After enabling Developer mode, you will see a red border around the chat box. Then, we can create new Apps by clicking the Create button.
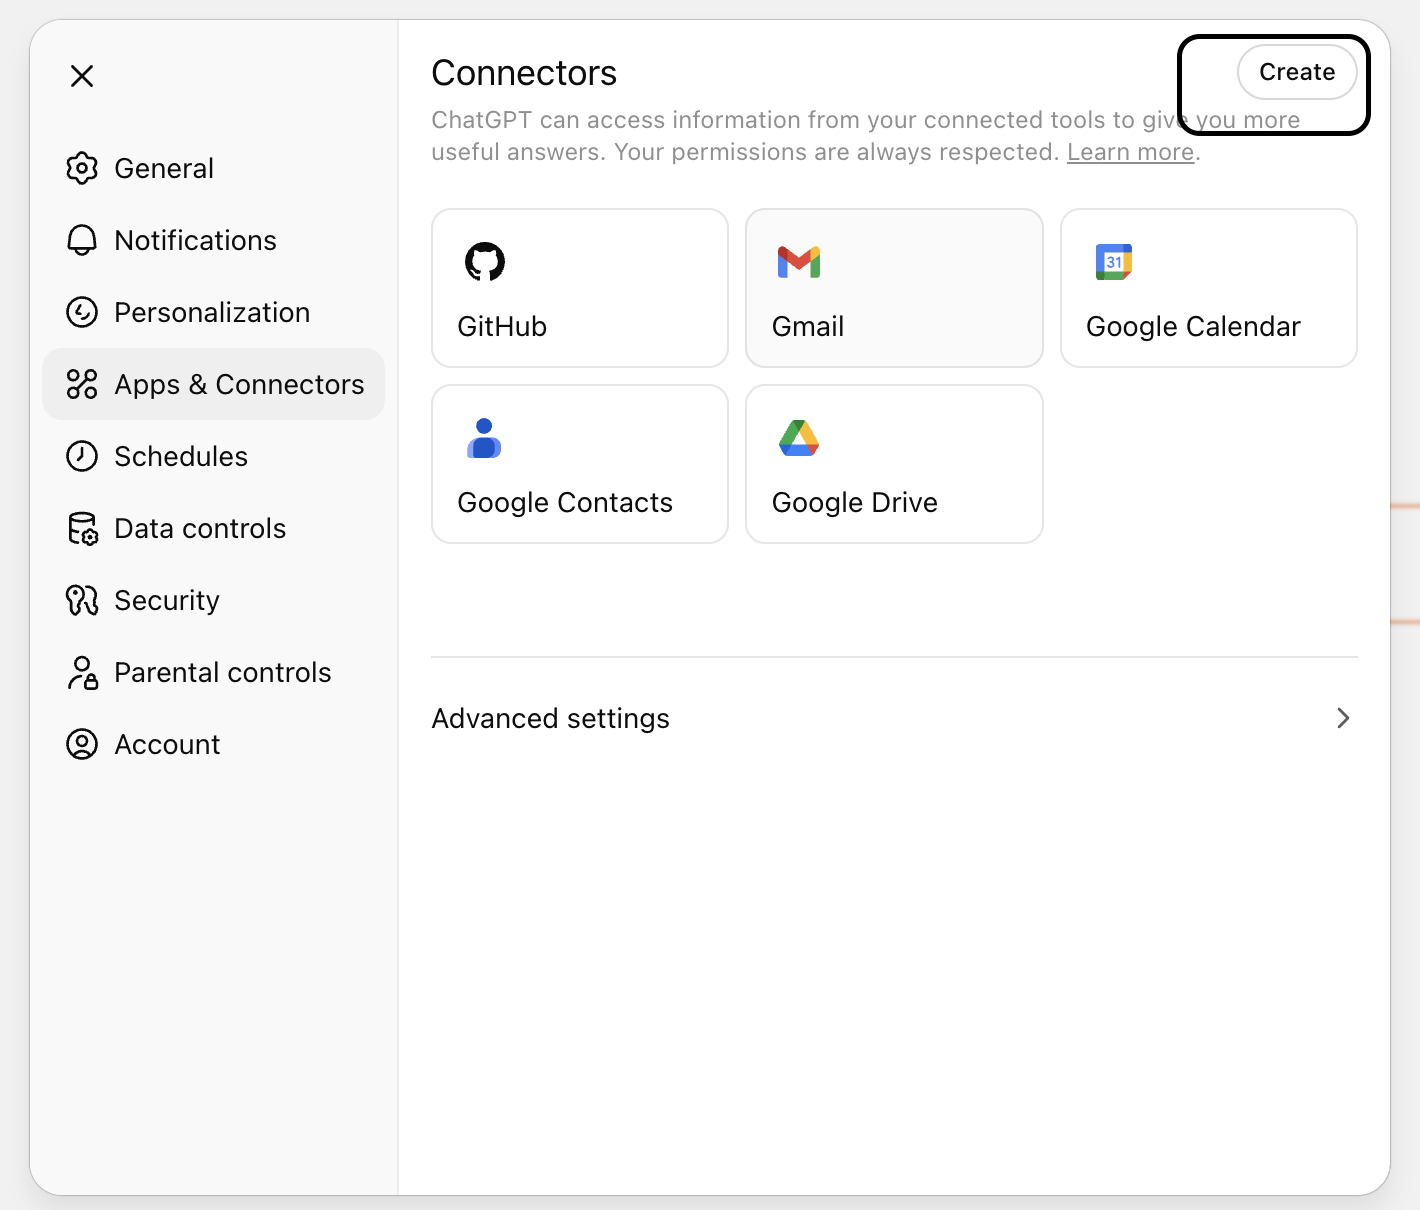
Input your information for the App. Please note that the MCP Server URL must be the one that you exposed through ngrok or your host if you have already deployed the server somewhere. In this tutorial, we will disable authentication for this App.

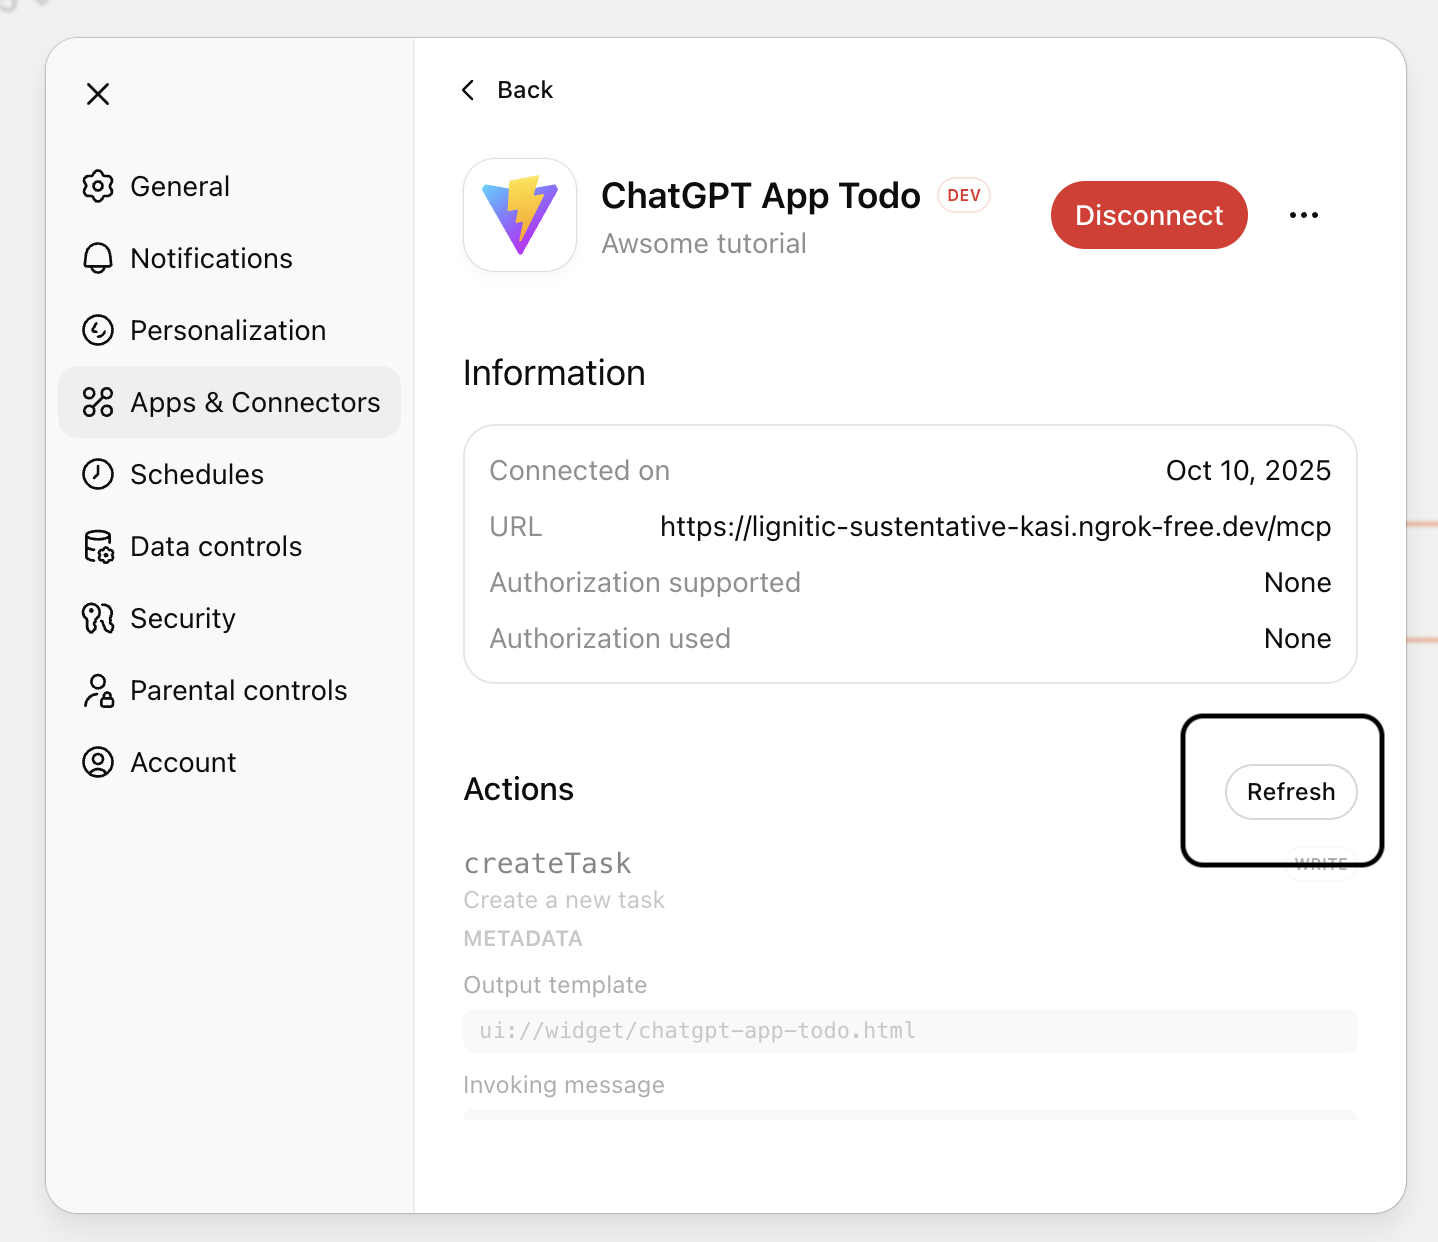
Click Create to create your App. After creating the App successfully, you will see something like this. Remember that if you change your MCP server, you need to click Refresh to make sure your App syncs with the changes from the MCP server.
Now we can test if our App can show in ChatGPT when we type “@ChatGPT App Todo Create a new task: finish reading the MCP tutorial.”.

Hold on, there is something not right, after it ran the MCP tool to create new task, there was no item in the App UI. What was wrong?
Back to the client/src/App.jsx, we found the issue that there is no communication between ChatGPT and our App. But how can we fix that?
When your App UI (the widget) is rendered inside ChatGPT, it runs in a sandboxed iframe. Within that iframe, the OpenAI Apps SDK injects a global object: window.openai. This gives you safe access to ChatGPT context including:
- Functions to interact with ChatGPT’s runtime (tool calling, sending follow-ups, etc.)
- Global data describing the current widget state (theme, locale, layout, tool input, tool output, etc.)
Now, when the ChatGPT call MCP tool, as mentioned in Building the MCP section, we need to return the structuredContent for the App to use, this value will be included in the global data of ChatGPT context, named toolOutput. So, in this case, we want to listen if the value of toolOutput is changed, then re-render the app to reflect the correct state.
In order to listen to the toolOutput value, let’s create a React Hook for listening the window.openai.toolOutput changes. We will call this useOpenAiGlobal, so that we can listen other value if we need to.
Create client/src/useOpenAiGlobal.js.
import { useSyncExternalStore } from "react";

export const SET_GLOBALS_EVENT_TYPE = "openai:set_globals";

export function useOpenAiGlobal(key) {
  return useSyncExternalStore(
    (onChange) => {
      if (typeof window === "undefined") {
        return () => {};
      }

      const handleSetGlobal = (event) => {
        const value = event.detail.globals[key];
        if (value === undefined) {
          return;
        }

        onChange();
      };

      window.addEventListener(SET_GLOBALS_EVENT_TYPE, handleSetGlobal, {
        passive: true,
      });

      return () => {
        window.removeEventListener(SET_GLOBALS_EVENT_TYPE, handleSetGlobal);
      };
    },
    () => window.openai?.[key] ?? null,
    () => window.openai?.[key] ?? null
  );
}
Then, in your client/src/App.jsx, use the hook that we just defined.
import { useOpenAiGlobal } from "./useOpenAiGlobal";

export default function App() {
  const toolOutput = window.openai ? useOpenAiGlobal("toolOutput") : null;

  if (window.openai) {
    useEffect(() => {
      fetchTasks();
    }, [toolOutput]);
  }
  // The existed code
}
What’s happening inside this code
- It first checks if
window.openaiexists (meaning the app is running inside ChatGPT’s environment). - If yes,
- It calls a custom React hook
useOpenAiGlobal("toolOutput"). - Every time
toolOutputchanges, we callsfetchTasks()to update the App state with new data. This is not the effective solution but the simplest solution to demostrate the communication between ChatGPT and the App.
- It calls a custom React hook
- If not (e.g., you’re running locally in a dev browser), it just sets
toolOutput = null.
Now test it again, you will see the App will reflect new state after the tool run successfully.
If you want to send follow up message to ChatGPT when you do some action in your app, you can use window.openai.sendFollowupMessage to send a message into the conversation. For example, in your client/src/App.jsx
  const addTask = async () => {
    // The existed code
    await window.openai.sendFollowUpMessage({
      prompt: `I just added a task to the todo list: ${text}.`,
    });
  };
Other than that, you can also call tool from your app, for example:
  const addTask = async () => {
    if (window.openai) {
      await window.openai.callTool("createTask", { text });
      await window.openai.sendFollowUpMessage({
        prompt: `I just added a task to the todo list: ${text}.`,
      });
    } else {
      await fetch("http://localhost:3000/tasks", {
        method: "POST",
        headers: { "Content-Type": "application/json" },
        body: JSON.stringify({ text }),
      });
      await fetchTasks();
    }
    setText("");
  };
In order to call a tool from your app, you need to tell ChatGPT about that through the MCP tool meta by declaring openai/widgetAccessible: true when registering the tool.
 server.registerTool('createTask', {
    _meta: {
      "openai/outputTemplate": "ui://widget/chatgpt-app-todo.html",
      "openai/toolInvocation/invoking": "Creating task...",
      "openai/toolInvocation/invoked": "Task created",
      "openai/widgetAccessible": true
    },
}, ({ text }) => {
    // Your logic
})
Summary
The technology stack behind a ChatGPT App isn’t particularly new or mysterious. It builds on ideas that web developers have been using for years:
- When ChatGPT shows your app, it’s really just embedding an iframe. That means your UI can be built with any web frontend technology such as React, Vue, Svelte, or even plain HTML, CSS, and JavaScript. There’s no special rendering engine or magic framework. It’s just a secure sandboxed web page.
- Inside that iframe, ChatGPT exposes a global object called
window.openai. This is how your App and ChatGPT talk to each other:- ChatGPT injects tool output and widget state into your app.
- Your app can send updates or trigger actions using APIs.
- On the backend, ChatGPT communicates with your server using the Model Context Protocol (MCP). MCP is an open protocol that defines how ChatGPT can discover, call, and receive data from your app. You register tools and resources on your server, and ChatGPT calls them over HTTP (or WebSocket) using JSON messages.
All of this is still in beta and currently limited to developer access. OpenAI has said that app submissions will open later in the year, so the SDK and MCP specifications for ChatGPT App are still evolving. So we should expect changes in APIs, event naming, and configuration formats as development continues.
The sample code of this tutorial can be find on my Github.
Discover more from Codeaholicguy
Subscribe to get the latest posts sent to your email.
